Daggerfall:Medora's Freedom
| Free Lysandus's lover from her tower. |
| Quest Giver: | Medora Direnni in the Direnni Tower on the Isle of Balfiera | ||||
|---|---|---|---|---|---|
| Location(s): | Direnni Tower, Isle of Balfiera and Shedungent, Wrothgarian Mountains | ||||
| Reward: | A random magical item | ||||
| Reputation Gain: | see Reputation Gain/Loss | ||||
| ID: | S0000003 | ||||
| Required Reputation: | No negative reputation with Medora Direnni | ||||
| Required Level: | 8 | ||||
|
|||||
|
|||||
Quick Walkthrough[edit]
- Find Medora within the Direnni Tower on the Isle of Balfiera.
- Talk to Medora and she tells you that only a Great Unicorn's Horn from Shedungent can free her.
- Travel to Shedungent to find and retrieve the unicorn's horn.
- Return the horn to Medora.
Detailed Walkthrough[edit]
Finding Medora[edit]
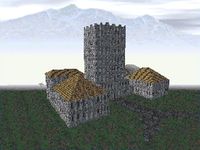
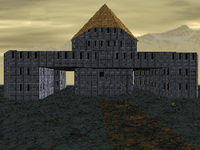
You will have to go through Direnni Tower four or five times to talk to Medora in the course of the game. You will be facing a lot of undead enemies in this dungeon, including many vampires and enemies who can paralyze you, so be prepared. You can fight or you can run past them when you can. Because they're undead, invisibility won't work on them. You may choose to set a Recall anchor at the entrance to save some time.
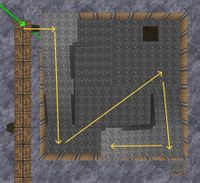
When you enter Direnni Tower, immediately turn left and go through the door. Descend the stairs to the right, turn left and cross the room. Go up the stairs on the opposite side, starting near the trap door in the floor. On the first landing, you will see a wheel in an alcove. This wheel will move a wall near the exit, but there's another wheel elsewhere that will activate the same wall, so you don't need to mess with it now.
Instead, ignore the wheel and turn right. Follow the stairs up several flights of stairs. When you reach the second-to-last landing you'll see the third door on the stairs. Enter the door, then turn left and you'll see a hidden door along the wall. Open the hidden door, then follow the passage beyond until you go down a ramp where you will find a hole in the floor. The hole is a one story drop.
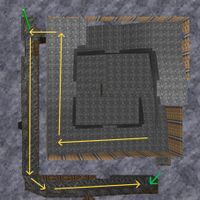
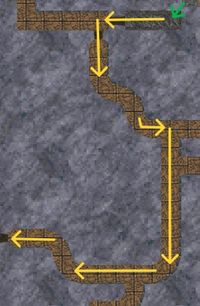
Once you enter the hole (by jumping, climbing, or levitating), turn around and you'll see another hidden stone door. Open the hidden door, then immediately turn left when you exit to find another door. Open that door and go through. Follow this curving hallway without turning down any passages until you find a lever on the wall to your left. At the lever, turn right and follow that curving hallway until you come to another door.
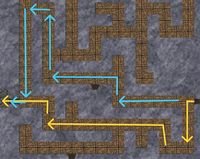
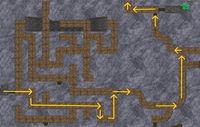
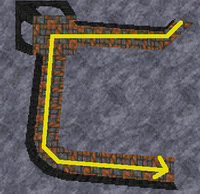
When you enter the door, turn left and follow that hallway to the end where you will find another door. Alternately you can go straight and follow the path outlined in blue, but it's more complicated with more turns and a higher chance for enemy encounters or taking a wrong turn.
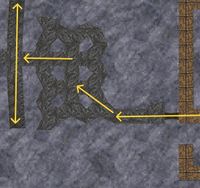
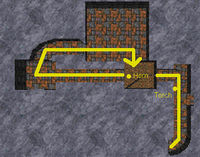
Open that door and enter a cavernous room with six stone pillars and three wraiths. There are three hallways leading to doors. The one in the middle has ramps that go down either side before you see the door. Both ramps end in the same location so follow it down either way. When you get to the bottom of either side of the ramp, turn and go down another ramp into to the lever room.
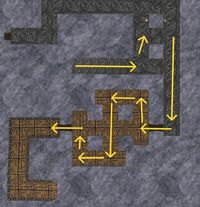
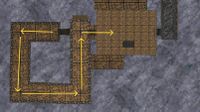
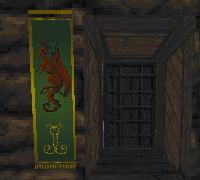
At the bottom of the ramp, you will see a pillar on your left with levers on each side. Pull the two levers on the sides of the pillar facing the bull tapestries, but leave the other two levers alone. Go to the door where you hear the Vampire Ancient, open it and follow the maze through to another door.
From there, follow the hallway upstairs until you are facing a lich. Just past the lich on your right is the door to Medora's chamber.
Medora's Request[edit]
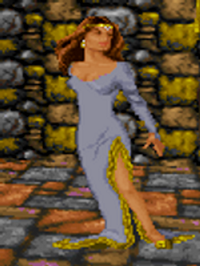
Talk to Medora. She will say,
- "Greetings (player's first name). I am Medora Direnni, former sorceress to the court of Daggerfall. I have an interest in helping you in your aim to exorcise the spirit of King Lysandus, but I can do little in my present circumstances. If you would pay a visit to a certain other sorceress, I can lift the curse on Direnni Tower. Will you do this for me, (player's first name)?"
Accept her request, and Medora replies:
- "I will be in your debt, (player's first name). Nulfaga, the mother of my former Lord Lysandus is a renowned mystic, but I have heard whispers that the loss of her son has turned her mad with grief. If this is not true, she can and will help me. I need a certain rare item, the horn of a Great Unicorn to break the curse on Direnni Tower. If Nulfaga is indeed mad, you much search her castle for this horn yourself and bring it back to me. I will expect you back in (time limit) days."
Returning to the Entrance by Foot[edit]
If you didn't set a Recall anchor near the entrance, you must backtrack your way to the exit by foot.
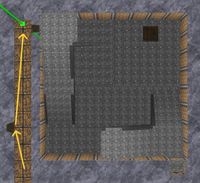
When leaving, follow the same route back to where you dropped down the hole in the secret passage. When you come to the formerly hidden open stone door leading to the hole on your right, turn left instead. Go straight ahead and around the next corner to your right and you'll see a wheel on the wall to your right. If you didn't mess with the wheel on the first landing back at the beginning, then you should see an alcove to a door ahead of you on the left wall and a stone wall ahead of you just past the alcove.
(If you see the wall ahead of you but no alcove or door, then you turned the wheel on the first landing. Spin the wheel here once to watch the wall move back into its original position, which will reveal the doorway.)
Once you see the door, turn the wheel and immediately run for the doorway as the wall starts moving. You should be able to get there before the wall blocks the alcove. Enter the alcove, but don't open or go through the door. Once the wall moves past you, go back into the hall and you will find yourself at the exit.
If you do find that you're not fast enough to beat the wall, you can go back to the drop down in the hidden passage and either climb or levitate up to get out the way you came in.
Finding the Unicorn's Horn[edit]
Travel to Shedungent in the Wrothgarian Mountains to find the unicorn's horn.
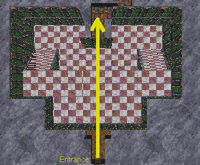
Once you enter Shedungent, walk a few steps to the north and click the Daggerfall banner beside the magical locked door. Type in shut up and the door to the throne room will open. Head north and take care of the two monsters you will encounter. Leave the throne room through the north door.
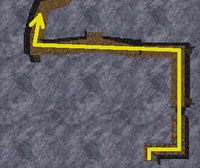
Head further north until the hallway ends, then head west up the ramp and past the intersection. When you stand in front of the door, head north.
Keep going north until the textures of the environment change. Follow the hallway until you come to an intersection. Head south and up the ramp.
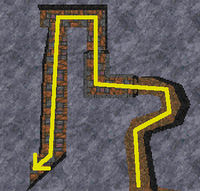
Walk through the hallway until you come to an intersection. Kill the monster and walk up the ramp to the south.
Follow this path past the first intersection. On the wall shortly before the second intersection, there is a torch. Pull it and it will open a path leading west. Follow this new path and head north when you reach the intersection. Continue on this path until you enter a new room. Look for a secret door on the southeast wall. Open it and you will find the unicorn's horn lying just in front of you on a bed. Pick it up and take it to Medora Direnni, who is waiting for your return.
Reward[edit]
Return to Medora with the unicorn horn and she will say,
- "You have succeeded in a most dangerous enterprise, (player's first name), but many more such trials await you. By bringing the horn to me, you have helped me lift the curse the Queen Dowager placed on my tower. I hope I can count on you for further aid. For now, take this (magic item) as your reward."
Reputation Gain/Loss[edit]
If you return with the unicorn's horn in time, you will gain reputation according to the table below.
| Factions/Person | Reputation Gain |
|---|---|
| Isle of Balfiera | +10 |
| Medora | +10 |
| Balfiera's associated factions | +5 |
Enemies[edit]
Direnni Tower
Shedungent
Notes[edit]
- Technically, you can start this quest as soon as you reach level 8, assuming you have no negative reputation with Medora; it is not necessary to do Lhotun's quest first. However, you must know the location of the Direnni Tower, which is revealed to you either by completing Lhotun's quest or by completing the quest Former Student Part IICompUSA.
- This quest has no time limit even though Medora gives a deadline which will appear in the journal. The command to end the quest after this time limit has expired is not executed, thus the quest will remain active until the horn is brought back to Medora.
- After finding and interacting with Medora, your quest log gets wiped.
- This bug is present as of the latest patch (v1.07.213).
- The Daggerfall Chronicles refers to this quest as "Medora's Freedom."
- Direnni Tower will always have two vampires near the entrance at the bottom floor of the staircase tower. These are useful Soul Trap targets, as their souls provide a good amount of extra enchanting power with no negative effects. They aren't the most potent souls, but are far easier to find and defeat than Vampire Ancients, Ancient Liches, or the special Dragonling.
- If you set an anchor where Medora is with Recall, teleporting there after you leave the dungeon will trap yourself in the dungeon.
Additional Dialogue[edit]
If you ask an NPC about the Unicorn Horn:
- "The delicate, spiraled horn curves slightly before ending in a deadly, sharp point. You had always heard that unicorn horns were of purest alabaster ivory. This one seems to be more like silver."
After you have accepted this quest, NPCs may say when asked for any news:
- "No one will go near the Isle of Balfiera since the Queen of Oblivion arrived."
- "Balfiera was once an exclusive resort. Now it is the land of the dead."
If you fail the quest, NPCs may say when asked for any news:
- "The fairy lady was supposedly trapped there by the evil of her own spellcraft."
- "(Random god)'s curse is on the former Witch of Daggerfall, damned forever in Balfiera."'
If you successfully complete the quest, NPCs may say when asked for any news:
- "A great hero saved the poor Lady of Balfiera from the curse of a wicked queen."
- "A (player's race) has lifted the curse on the Lady of Balfiera and restored the land."
Quest Log[edit]
| Medora's Freedom (S0000003) | ||
|---|---|---|
| Stage/ Index |
Finishes Quest | Journal Entry |
| 0 | (Date): Medora, the former court sorceress of Daggerfall, has sent me [sic] Shedungent in the Wrothgarian Mountains. Shedugent is home to Nulfaga, mother of Lysandus There I must retrieve the horn of the Great Unicorn. If Nulfaga is unable to help, I must search her castle Shedugent for the horn myself. I have (time limit) days to return to Direnni Tower. | |
| Prev: The Missing Prince | Up: Main Quest | Next: Dust of Restful Death |
