Oblivion:Sardavar Leed
|
|||
|---|---|---|---|
| # of Zones | 2 | ||
| # of Welkynd Stones | 16 | ||
| # of Varla Stones | 2 | ||
| Occupants | |||
| Conjurer Enemies, Daedra (1 boss-level Conjurer) |
|||
| Important Treasure | |||
| 1 boss-level Ayleid Cask 01 | |||
| Console Location Code(s) | |||
| SardavarLeedExterior, SardavarLeed, SardavarLeed02 | |||
| Region | |||
| Great Forest | |||
| Location | |||
| South of the Imperial City, on the Red Ring Road | |||
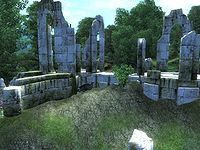
Sardavar Leed is a medium-sized Ayleid ruin south of the Imperial City containing conjurers. It contains two zones: Sardavar Leed and Sardavar Leed Lattasel.
Notes[edit]
- The first edition of the Prima Official Game Guide lists Sardavar Leed as a location containing an Ayleid Statue; however, there is no statue to be found in the ruin.
- According to The Adabal-a, Queen Alessia grew up as a slave in Sardavar Leed. The fact that a nearby fort is named Fort Alessia is unlikely to be a coincidence.
- Sardavar Leed also appears in ESO.
Exterior[edit]
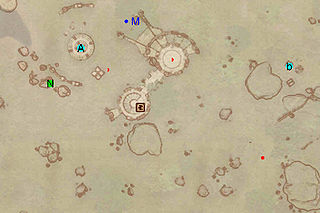
- The exterior is located at coordinates: Tamriel 9, 4
- This location's map marker (M on map) is named Sardavar Leed (editor name SardavarLeedMapMarker). The entrance door is S of the marker, 110 feet away.
- 0-2 Conjurer Enemies (each 33% probability Conjurer, 67% Daedra) are near the entrance
- 1 Wilderness Creature (Forest variety) is near the entrance
- 1 Nirnroot is at location N on map
- The following plants can be found near the entrance: 6 Fly Amanita plants, 2 Lady's Mantle plants, 3 Lady's Smock plants, 6 Lavender plants, 11 Monkshood plants, 2 Morning Glory plants, 3 Peony plants, and 3 Summer Bolete plants
- 1 Ayleid Well is at A
- 1 bedroll is at b
Zone 1: Sardavar Leed[edit]
This zone is quite complex, containing multiple vertical levels and paths; as a result, the in-game map can easily confuse more than it helps. It features a hefty amount of treasure and a large number of enemies, so a thorough exploration may be long and challenging.
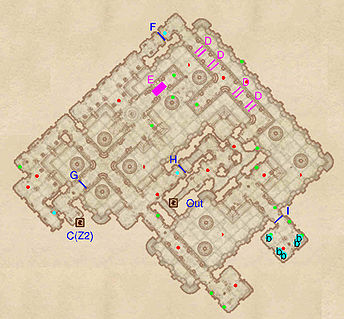
Upon entering through door Out, beware the patrolling conjurer on the bridge above, who will not hesitate to jump down and fight; proceed forward until you reach an intersection with another conjurer on a second bridge above. Both bridges and their connecting corridor are inaccessible, but do not contain any loot containers or items. The path to the left leads down to a closed iron gate (H) which can only be opened by a pressure plate (cyan dot on map) on the other side, while the path to the right leads to the first part of the large central chamber, on the upper level. After defeating a Daedra, search the nearby minor loot reliquary and claim the four Welkynd Stones from the pedestals. Head over the stone bridge and unlock the door at I, which leads to a sleeping area with a conjurer, two minor loot reliquaries, a minor loot chest, two beds, and three bedrolls (b). Backtrack to the previous intersection, as it is too early to jump down to the lower level.
Going straight ahead from the initial intersection will lead you to another upper-level pathway, this time complicated by an enemy and eight Falling Blades traps at D. Search the minor loot reliquary along the way and lower iron gate F by standing on the nearby pressure plate (cyan dot). The next area is quite large, containing eight Welkynd Stones, a minor loot chest, a Daedra, and an inactive glowing altar. Northeast of the altar another minor loot chest is visible, but watch out for the Crumbling Bridge trap at E.
For now, ignore the southeastern stairs leading down and instead head southwest until you reach a three-way intersection. Straight ahead is an iron gate (G) opened elsewhere, so instead take the southeastern route. You will arrive in an area with three options. To the northeast is the iron gate at H, which you can use to shorten your route back to the exit on your return from the next zone. Ignore the stairs nearby and instead proceed southeast over a stone bridge, defeating two Daedra and searching a minor loot chest along the way, until you reach a room with a conjurer, a minor loot chest, and a minor loot coffer.
Backtrack and take the previously ignored stairs, which lead down to the lower level of the zone. This level winds throughout most of the central chamber and hosts four minor loot chests and up to four Daedra. For a thorough exploration, first head northeast and hop through the gap in the stonework, searching a minor loot chest in the gap. Proceed northwest, raiding a minor loot chest in an alcove on the southwestern wall and another minor loot chest about halfway along the northeastern wall. Once you reach the end, turn southwest and jump through the gap in the masonry. Keep to the south, search the minor loot chest on a nearby pillar, and head up the stairs to find yourself again by the glowing altar. Return to the three-way intersection and head northwest. The next area hosts two conjurers guarding a minor loot coffer and four Welkynd Stones. Proceed west to find the press block (cyan dot) which opens iron gate G and thus clears the path to door C into the next zone, Sardavar Leed Lattasel.
Occupants:
- 6 Conjurers
- 1 Conjurer Enemy (each 50% probability Conjurer, 50% Daedra)
- 4-8 Daedra
- 1 Daedra (always best possible level)
Treasure:
- 2 Ayleid Coffers (both locked)
- 4 Ayleid Reliquaries (2 locked)
- 1 Chest 01 (locked)
- 1 Chest 02
- 3 Chests 03
- 1 Chest 04
- 2 Restoration Ayleid Chests (1 locked)
- 1 Restoration Chest
- 16 Welkynd Stones (four are on pedestals on the upper level northwest of the sleeping chamber, eight are on pedestals on the upper level in the northern area, and four are on pedestals on the upper level in the western area)
- The following potions will always be found: 1 Poison of Slowing
Traps:
- 1 Crumbling Bridge trap at location E on map
- 8 Falling Blades traps at D
Doors and Gates:
- There are two doors in/out of this zone
- 1 door (at Out) leads outside
- 1 door (at C) leads to the zone Sardavar Leed Lattasel
- 1 Gate at I (locked)
- 3 Iron Gates at F, G, and H (F and H opened by nearby pressure plates; G opened by the nearby press block (cyan dots))
Other:
- 2 beds at locations b on map
- 3 bedrolls at b
Zone 2: Sardavar Leed Lattasel[edit]
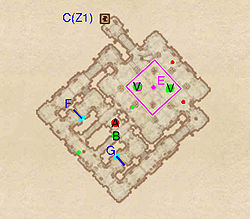
This zone is much smaller and simpler than the previous area, and contains decent treasure. Upon entering, you will face a room with two enemies struggling with a Gas Room trap at D and its Gas trap at E, effectively guarding two Varla Stones (V). You can wait for the enemies to meet their demise in the gas, or you can simply fight them in their weakened state. Brave the gas to claim the two stones (as they are high on their pedestals, use arrows or target spells to knock them off) and search the minor loot chest and minor loot reliquary in the room.
There are four exits to the northwest, southwest, and southeast, all leading down to the same area. However, the southwestern exits provide more direct access and allow you to snipe down into the next area, which contains the boss-level conjurer at A. Alternatively, you can reach the conjurer by jumping down or heading around and opening the two iron gates (F and G) using the nearby push blocks. Near the boss-level conjurer, you will find the boss cask (B) and a minor loot coffer. Finally, backtrack to door C leading back to the first zone, Sardavar Leed.
Occupants:
- 1 boss-level Conjurer at location A on map
- 2 Conjurer Enemies (each 50% probability Conjurer, 50% Daedra)
Treasure:
- 1 boss-level Ayleid Cask 01 (Conjurer variety; locked) at location B on map
- 1 Ayleid Coffer
- 1 Ayleid Reliquary (locked)
- 1 Chest 04
- 2 Varla Stones at V
Traps:
Doors and Gates:
- There is one door (at C) in/out of this zone, leading to the zone Sardavar Leed
- 2 Iron Gates at F and G (each opened by nearby push blocks (cyan dots))


