Skyrim:Volkihar Keep
This article is about the area of Castle Volkihar used by the Volkihar vampire clan. For the dungeon area of the castle, see Castle Volkihar.
|
|||
|---|---|---|---|
| Added by | Dawnguard | ||
| # of Zones | 2 | ||
| Clearable | No | ||
| Respawn Time | 10 days | ||
| Occupants | |||
| Volkihar Vampire Clan | |||
| Important Treasure | |||
| The Aetherium Wars Bone Hawk Amulet Bone Hawk Ring Dragon Priest Dagger |
|||
| Console Location Code(s) | |||
| DLC1VampireCastleGuildhall, DLC1VampireCastleBossRoom | |||
| Region | |||
| Haafingar | |||
| Location | |||
| Northwest of Solitude | |||
| Special Features | |||
| # of Alchemy Labs | 2 | ||
| # of Arcane Enchanters | 2 | ||
| # of Tanning Racks | 1 | ||
| # of Forges/Anvils | 1 | ||
| # of Grindstones | 1 | ||
| # of Workbenches | 1 | ||
| # of Cooking Pots/Spits | 1 | ||

Volkihar Keep is a large fortress on an island far northwest of Solitude connected to Castle Volkihar which serves as the Volkihar vampire clan's home. It contains two zones: Volkihar Keep and Volkihar Cathedral.
Though you can travel to the island immediately upon installing the Dawnguard official add-on, the keep is initially inaccessible. You must work with the Dawnguard vampire hunters for a short time in order to gain entry, even if you wish to side with the Volkihar vampire clan during the add-on's main questline. Once you locate Serana, she tells you to take her here. After reaching the island, you will be able to gain entrance to the keep by crossing the bridge connecting to the island. On your first visit, she will stop you on the bridge to say a few words before the watchman standing guard will open the gate to the keep.
Outside the keep, there is little of note besides the bone hawks circling the castle. Throughout the inside of the keep are a large number of fully stocked bookcases, as well as various poisonous flowers in planters scattered around. Some of the keep is destroyed, making certain areas inaccessible, though the path to the courtyard at the back end of the top floor may be repaired after completing Dawnguard's main questline on the Volkihar side by talking to Garan Marethi. This repair is free of charge, and is completed the next time you enter the keep.
Volkihar Keep Residents[edit]
|
|
* The presence of these people in this location is affected by quests and/or your choices in gameplay.
Related Quests[edit]
- Bloodline: Choose your side!
- Kindred Judgment: Confront Lord Harkon.
Walkthrough[edit]
Volkihar Keep[edit]
Doors[edit]A: Castle Exterior Rooms[edit]
|

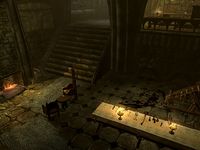
Dining Hall: This is generally where most NPCs can be found if they aren't in their usual locations. The only items of note are three Potions of Blood, one on each table, and nine portions of human flesh. As with all items in the keep, these will respawn after you spend ten days outside the castle. Some Vampire Cattle can be seen here serving drinks. Platters and a nightshade planter can also be found here.
Smith: Fura Bloodmouth and Hestla can usually be found here, the former attacking the dummies, and the latter working in the smithing area. The room features the usual smithing amenities, including a grindstone, workbench, tanning rack, and forge, though the area lacks a smelter. The four weapon racks around the room each contain one leveled weapon. The forge area itself contains a few iron ingots, steel ingots, gold ore, a copy of The Aetherium Wars, two weapon plaques above the forge (one with an iron warhammer, the other with a leveled sword), and miscellaneous smithing items. At the southern end is a small archery range with two Imperial bows mounted behind the stand and various arrows lying around. There are two coffin areas, one in the northeast and one in the southwest, both of which contain minor loot. You can also find a white blacksmith's apron here.
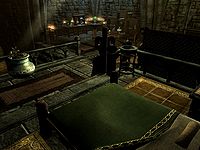
Chalice Room: This room holds the Bloodstone Chalice, which, if you drink from it as a vampire, will allow your Vampiric Drain spell to also absorb magicka and stamina for the duration of the effect (which is lengthened every time you bring an Ancient Vampire body part back to Feran Sadri in Ancient Power). In addition, two bottles of skooma, a bottle of spiced wine, and a bowl of moon sugar are on a wardrobe, a lute is in between the bookcases, an iron dagger is on a table, and a pair of vampire boots is on the floor, next to a chair.
Lab: Feran Sadri and Ronthil can both usually be found here working on the first floor, and Garan Marethi can be found on the second. Lord Harkon frequents the first floor as well. The first floor holds an alchemy lab, two locked display cases containing alchemy ingredients including a Daedra heart, one locked display case containing poisons and a Frenzy poison recipe, and a set of shelves containing more ingredients. A dead alchemist can be found on the table in the first floor. Ronthil can sometimes be found sleeping on the floor behind the angled bookcase in the southeast corner. The second floor holds an arcane enchanter, a locked display case containing a black soul gem, and another locked display case containing one of each soul gem except grand and an Elven Dagger of Binding. On the balcony overlooking the dining hall, another copy of The Aetherium Wars is on a table, while a set of vampire armor and a pair of vampire boots are on a shelf just behind the balcony. Near the shelf is a coffin that Garan Marethi frequently uses.
Coffin Room: West of the lab along the stairwell connecting the first and second floors is a small room containing eight coffins, with two weapon racks against the east wall, and two wardrobes and a table holding some clothing and a locked display case on the west wall. The clothing includes four sets of vampire armor (two black, one light gray, and one red) and two pairs of vampire boots, and the display case contains two regular unenchanted amulets and a Bone Hawk amulet. This room serves as the sleeping quarters for most of the less important vampires of the keep and those who work in the alchemy section of the lab.
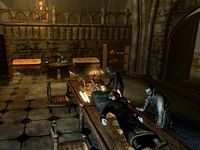
Lord Harkon's Quarters: Frequented by Lord Harkon, the torture room contains a bloody rack, a throne and a chair facing the fire, and a large empty cage near the chairs. Strangely, a Mythic Dawn tapestry hangs above the torture rack. A werewolf pelt is in the unlocked display case to the immediate right of the entrance, and various poisons, embalming tools, and a woodcutter's axe are on the table between the case and the rack. On a high wall shelf above the display case and bookcases are two samples each of deathbell and nightshade. Up the stairs to the north, four locked display cases on the west wall contain, from left to right: a Bone Hawk amulet, a Bone Hawk ring, and a diamond in the first, an enchanted necklace in the second, a leveled scroll in the third, and four human hearts in the last. Two common soul gems, a Potion of Blood, a scroll, and an unlocked display case containing a Dragon Priest dagger are opposite the first four cases to the east. A long chest under the table to the right of the unlocked display case is safe for storage. Past the door to the north is Lord Harkon's personal coffin room, containing a coffin, a leveled weapon on the rack to the left of the coffin, and a plate to the right of the coffin holding gold and gems.
Serana's Room: This room was originally owned by Serana, and is derelict until the completion of the quest The Bloodstone Chalice. No one seems to enter it at any point, including Serana herself, possibly because her bed is erroneously marked as belonging to Valerica. An arcane enchanter and an alchemy lab are in the southwest corner, with a few potions and soul gems around them. In the northwest part of the room is a small closet containing a wardrobe and two locked display cases, with one containing two unenchanted necklaces, and the other containing an enchanted dagger and an unenchanted ring. Also scattered around the room are various planters and pots holding assorted flora, as well as minor loot around the two nightstands flanking the bed.
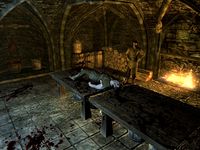
Kitchen: After passing through a small corridor northeast of the dining hall with kegs of dripping blood, you will find the kitchen. There is little of note here aside from minor items, a blooding rack, a dead Vampire Cattle on a table, a small closet with a hanging elves ear plant, and a coffin usually used by Rargal Thrallmaster. On the east side of the room near the coffin are three sacks; the one to the left is not safe for storage, but the other two are.
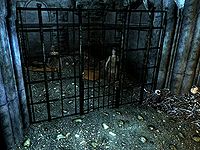
Thrall Pen: North of the kitchen is the thrall pen. Before going down the stairs, you can find the uncommon tavern clothes on a wardrobe to the left, along with various other low-value apparel. Down the stairs, you'll find two large cages, each with three Vampire Cattle inside. These Cattle have no dialogue options; when they are selected, you have the option of feeding on them with no adverse side effects.
Volkihar Cathedral[edit]

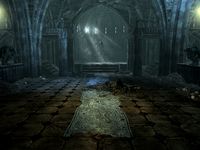
The cathedral is a room attached to the northwest of the keep, unused aside from the related quests. An unusable shrine to Molag Bal is at the apex of the room to the west, with several short sets of stairs leading to raised platforms and small connected balconies on the north and south sides. Lord Harkon brings you here at the end of the quest Bloodline if you choose to become a Vampire Lord, at which time a Vampire Cattle stands near the door. The final battle also occurs here during the quest Kindred Judgment. It is generally quite bare, with a chest by the door containing minor leveled loot appearing during Kindred Judgement.
Two versions of the cathedral exist; one is actually part of the same cell as the rest of the keep, while the other is a separate cell that is used for the battle during Kindred Judgement. The door leading to the separate cell is positioned in front of the regular door and permanently remains in place after the quest, rendering the regular cathedral inaccessible without use of the console.
Notes[edit]
- Although technically in Haafingar, anything you steal from the keep doesn't count towards completing a bedlam job for Delvin Mallory in Solitude.
- All wardrobes and bookcases within the keep are safe for storage. Unless otherwise noted, other containers respawn after ten days along with the rest of the keep.
- With 38 of the 41 containers being safe for storage, all regular crafting amenities except a smelter, and three merchants available within the keep, this location can be ideal for use as a home if you side with the Volkihar vampire clan.
- The fact that the inside of the keep will respawn every ten days can be especially beneficial to vampire characters who did not side with the Volkihar, as it allows access to four respawning Potions of Blood, with one on each table in the main dining room and another in Lord Harkon's quarters. However, these potions will have to be stolen.
- You can find a Mythic Dawn Banner in Lord Harkon's room.
- Serana's room will only be furnished after completing the quest The Bloodstone Chalice, though she never stays or sleeps there.
- If you lose your vampirism after siding with the Volkihar vampires in the Dawnguard questline, NPCs in the keep will refuse to speak to you until you have Lord Harkon or Serana change you back. However, you are not required to become a Vampire Lord again; being a regular vampire will work. All NPCs will behave the same regardless of your vampire type.
- The inhabitants here can be seen eating what looks like bloody meat, instead of the bread that normal NPC's eat throughout the game.
- The first time you enter the thrall pen, you will hear the same dungeon music that plays when you discover Nordic ruins, Dwemer ruins, caves, and mines.
- If you have allied with the Volkihar vampire clan, Dawnguard scouts will occasionally appear near the fast travel arrival point to the castle.
- If you have allied with the Dawnguard, all the bodies of named NPCs (except Lord Harkon) killed during the quest Kindred Judgment will never disappear.
- If the portcullis is closed, you can glitch through it by holding a wooden plate or platter against it then running against the plate or using the Whirlwind Sprint shout until you clip through the portcullis. Alternatively, you can hold the plate against the diagonal walls surrounding the portcullis and sprint your way across. In this case, the vampires inside will be friendly and treat you as a vampire, and all items in the keep will be free to take, allowing you to potentially stock up on materials before proceeding with the Dawnguard questline.[verification needed — see talk page] If you glitch your way in before "Bloodline" is active, you can take almost everything from the keep freely, though there is a chance the vampires may act as if you hadn't spoken to Lord Harkon yet. If that is the case, you won't be able to ask Feran Sadri, Hestla, or Ronthil what they have for sale, nor will you be able to ask anyone for training. You might also be able to interact with the vampires if you glitch in during A New Order, though items in the castle have to be stolen.
- If you have not allied with the Volkihar, the Bloodstone Chalice still has the option to be interacted with, even though you can't. It still cannot be interacted with if you side with the Dawnguard and then become a Vampire Lord later on, though the hover text indicates otherwise.
- All of the cattle in the slave pens will vanish without a trace once the Dawnguard are joined and Kindred Judgement is started.
- If you take up Harkon's offer of the Vampire Lord, you will wake up in the version of the cathedral that is seen when you fight him during Kindred Judgement (the boss chest is there in the corner), but the next time you visit, the "normal" version of the cathedral is seen, instead (there is no boss chest).
- If you finish the Dawnguard questline for the Dawnguard, everything in the castle will still be treated as owned, and taking them will still count as theft. However, you can remove the stolen tags by either placing them in the boss chest in the cathedral and ordering a follower to retrieve them from it, or by placing them into the cupboard behind the counter at the Riverwood Trader and purchasing them from Lucan.
Bugs[edit]
- Although the keep is located within Haafingar, crimes committed here may earn a bounty in Whiterun Hold.
- This behavior also means that even though the castle is in Haafingar, any Bedlam quests from the Thieves Guild to be done in Haafingar also will not work, as the castle is part of Whiterun.
- If you discover the castle before starting Bloodline, the watchman may not notice you with Serana, and the portcullis may not open.
- Use any of the plate tricks mentioned above, and enter. The Dawnguard questline should continue normally from there.
- Wait until Bloodline is active before discovering the castle. The watchman should recognize Serana properly and open the portcullis.
- If you remove the Dragon Priest Dagger from the display case in Lord Harkon's room, you may not be able to put anything in there. ?
Gallery[edit]
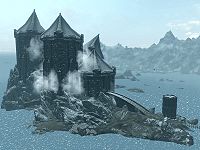
Another view of the keep
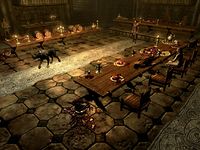
Dining Hall

Smith

Chalice Room
Lab
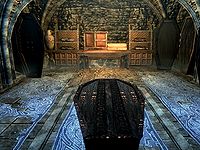
Coffin Room
Lord Harkon's Quarters
Serana's Room
Kitchen
Thrall Pen
Volkihar Cathedral


- Skyrim-Places-Castles
- Skyrim-Places
- Skyrim-Places-Haafingar
- Skyrim-Places-Alchemy Labs
- Skyrim-Places-Arcane Enchanters
- Skyrim-Places-Tanning Racks
- Skyrim-Places-Forges
- Skyrim-Places-Grindstones
- Skyrim-Places-Workbenches
- Skyrim-Places-Cooking Pots
- Skyrim-Dawnguard
- Skyrim-Dawnguard-Places
- Skyrim-Confirmed Bugs
- Skyrim-Unconfirmed Bugs